
Different shaped makeup sponges! If you’ve shopped around for makeup sponges, you will see that nowadays they come in all kinds of shapes & sizes! But the baffling thing is this: how do you use them? I once did a search & there aren’t that many guides / explanations on how to use them. And I’m here to explain it for you!
To buy this pack of makeup sponges, click on: Hotrose 5 pc Makeup Sponges, $9, & I also included the Real Techniques Miracle Sponge, $6.
Instructions:
With these kind of sponges, you’re supposed to soak them, squeeze the water out, & then dab it in foundation & apply to the skin. You could also apply eye shadow, concealer, blush, bronzer, the list goes on! Liquid, cream, powder; these sponges are really versatile & how you can use them! And of course if you really want the airbrushed look, you should dab your makeup on when you apply.


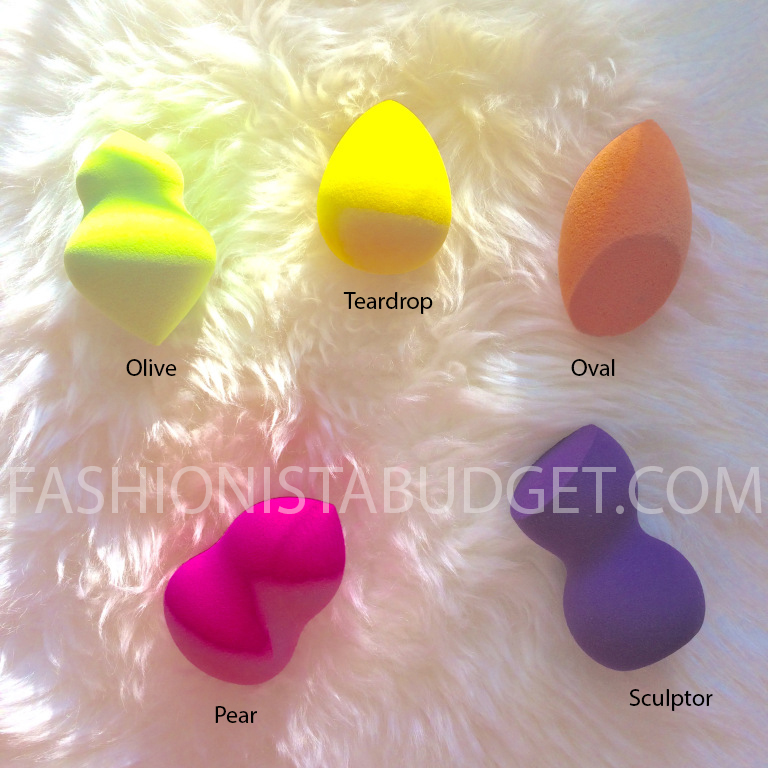
-Teardrop shaped. Of course, the original Beauty Blender is shaped like a teardrop. You could use the wide bottom for the larger parts of your face, & you could flip to the pointed end & use that for the smaller areas of your face; like around the nose & the eyes.


-Pear shaped. This is just like the teardrop shaped, just slightly contoured in the middle for a better grip. With the wider end, you could use it also to blend highlighter, by rolling it i.e. on the apples of your cheeks, or on your forehead. Again the pointed end is for the small areas of your face.


-Olive shaped. Of course this looks strange, & you might think, how do you use it? This one is meant for targeting smaller areas of your face. And like above, you could use the pointed ends for those areas. The sides of this sponge, you can use it to roll across your skin, for things like blush, highlighter, or bronzer. When you want to contour, you could use the smaller end for highlighting, & the wider opposite end for adding shadow.


-The Oval. I really should call it the pointed oval. Of course the sponge I’m featuring here is the Real Techniques Miracle Sponge. The round sides you use to apply foundation to the face, the flat end you could use to apply to larger areas like your forehead / cheeks. The pointed end again, is for targeting small areas.


-The Sculptor. This I think is the strangest looking one. When I first saw it in store, I was like, how do you use it? This one is primarily meant for stippling foundation, over large areas of your face.


Dr. Bronner’s Castile Soap, 2 oz to 32 oz, $5-$18
The best way to clean them? I have a whole collection of makeup sponges, so I’ve gone through a lot of trial & error cleaning them before finding a great solution. The best soap? Dr. Bronner’s Castile Soap! It is a really amazing multi-tasker, & I use it to clean my makeup brushes as well! The most efficient way to do it is to squirt some of the soap on your sponge, & then submerge the sponge under water (i.e. in a cup, or container). Squeeze & release the sponge a couple times while submersed, & you will see the makeup come out! The amazing thing about castile soap is that it soaks right into the sponge, penetrating for a deep clean.
The Last Resort: These makeup sponges, as fun as they are, are a big pain in the butt to clean. I had gotten a white makeup sponge from Sephora, & I could not get all the makeup out! And do you know what I used that got out everything? Makeup remover. Generally the castile soap does a pretty good job at cleaning these things, but a white makeup sponge literally showed everything like a napkin! I literally poured makeup remover into the sponge, squeezed it, & the makeup just came oozing out. I don’t like spending a fortune on makeup remover & my go to staple is usually Neutrogena’s Oil Free Makeup Remover.
Like everything else I write, I hope this was helpful for you! Did you like this post? Check out other articles below!
Related Articles:
HOW TO USE THE BEAUTY BLENDER!! AND MY MASSIVE REVIEW OF MAKEUP SPONGES!!
Drugstore foundations that makeup artists love
The Best Makeup Brushes!! ..And the genius hack on how to clean them!

Thanks for the explanation and demonstration. I’ve kinda wondered. I still just use my original pink sponge, but will now try to branch out. I also appreciate the info on cleaning.
LikeLike
You’re welcome!
LikeLike
This post was great! I have wondered what the difference was for these different shaped beauty blenders. Thanks for the helpful info and tips!
LikeLike
you’re welcome!
LikeLike
Thanks for the knowledge! I have the original teardrop beauty blender and was always curious about how the others would be used. I have never seen an olive shaped one but might go look for one as it seems very useful!
LikeLike
you’re welcome! Go for it!
LikeLike
those sponges are like little sculptures. Very interesting about the soap!
LikeLike
I’m glad you liked it! Castile soap is amazing, and for all kinds of uses! Definitely try some!
LikeLike
good to know. I’ve only ever tried the beauty blender
LikeLiked by 1 person
Wow, I ‘ve never seen these sponges, very nice and usefull.
LikeLiked by 1 person
I literally never knew there was a difference between the sponges! I love this though! Now I finally know what to do 🙂
LikeLike
great! I’m glad you found it useful!
LikeLike
I love this post! I think makeup sponges are amazing, but seriously under utilized and under appreciated!
LikeLike
thank you! I’m glad you liked it!
LikeLike
Interesting information. I didn’t know what the different shapes of sponges were used for doing.
LikeLike
you’re welcome i’m glad you liked it!
LikeLike
Thanks for the tips on cleaning something I will be passing on to my granddaughter who wants to be a fashion designer/make up artist and these tips are good to know
LikeLike
thank you! I just wrote another post on supplies for makeup artists! Hope you like it & check out some others as well!
LikeLike
What a cool tutorial, I never knew they existed. I can use this for my makeup artistry
LikeLike
thank you! i just published another article on tools for makeup artists! you should check it out!
LikeLike
Thanks for the article. My granddaughter just received a tear drop shaped one in a Beauty Box she subscribes to and we were wonder if there were any special tips or tricks to using it.
LikeLike
you’re welcome I’m glad you liked it!
LikeLike
I never knew there was a difference. You live, you learn! Your blog is the best! ❤️
LikeLike
thanks!
LikeLike
very useful information 🙂
LikeLike
thank you!
LikeLike
This is a great article! I’ve wondered what the benefits/purpose of all these different shaped sponges were!
LikeLike
thank you! check out some of the other articles in my blog!
LikeLike
I always wondered what all those shapes were for. Thanks for the great info.
LikeLike
you’re welcome! check back for more info!
LikeLike
you’re welcome! check back on my blog for more updates!
LikeLike
you’re welcome! check back on my blog for new info!
LikeLike
This was a great article. I learned a lot about sponges that I never know before. Thank you!
LikeLike
you’re welcome! glad you liked it!
LikeLike
This was really helpful! I’ve seen the castille soap in the store but didn’t know it could also be used to clean makeup brushes and sponges. Such a great tip!
LikeLike
Thanks for all the tips! Ive seen all these sponges but to honest wasn’t sure how to use them. Happy New Year!
LikeLike
Great tips thanks! I really wasn’t sure what to use to clean them because there are a ton of different ways on the internet! I’m definitely trying this!
LikeLike